The Daily Prophet AR
- Lekha Mirjankar

- Aug 6, 2020
- 6 min read
Updated: Oct 13, 2020
Ever since I saw the Harry Potter series as a child, I have been fascinated by it immensely and am waiting for the my Hogwarts acceptance letter to arrive! From finding my Hogwarts house on Pottermore which is Gryffindor but I am a Ravenclaw at heart (I am sure the sorting hat will consider my opinion) to finding my Patronus which is Russian Blue cat (Purrrfectt!!) to practicing the magical spells, I have done it all!! Harry Potter is much more than a series to me and has taught me so much about friendship, love and bravery. Hogwarts has truly become my home.
While being enchanted by this magical world, I decided to recreate one of the wizarding element using the magic of Augmented Reality. If you have seen Harry Potter, you must be aware of the popular wizarding newspaper 'The Daily Prophet' which has moving images. In the magical world of Hogwarts, the newspaper has moving images and even the paintings can communicate. I decided to give this one a try!
In this blog post, I will share with you all how I recreated this magic using Unity and Vuforia.
“Let us step into the night and pursue that flighty temptress, adventure.”
Firstly make sure you have Unity and Vuforia installed in your system. You will need a copy of 'The Daily Prophet' which you can find anywhere on the internet and print it. Select an image from this copy that you want to set into a moving image and also a video that will basically be the element that will give the 'moving image' effect.
I already had 'The Daily Prophet' and used Dumbledore's image and I downloaded a video that will be best suited for the same.

The main principle behind this is that when we place 'The Daily Prophet' in front of the camera, the image will be recognized and it will trigger the video which will provide the desired effect.
Hop on your broom and get aboard on this magical journey!
Step 1 - Create Project :
Create a new Unity Project by starting the Unity Hub. Click on New, a new window will open. Select 3D and give your project a desired name and location. Hit CREATE.

After this go to Edit --> Project settings --> Player and enable Vuforia Augmented Reality supported checkbox.

Step 2 - Import AR Camera :
Now, in the hierarchy window, right click (or click on create) and select Vuforia Engine --> AR Camera. Click Import. An AR camera will be added to your scene and this will be our main camera for this project so you can go ahead and delete the Main Camera from the scene by right clicking on it and hit delete.

Step 3 - Image :
Again right click in the hierarchy and select Vuforia Engine --> Image. Hit Import. This will import an ImageTarget into your main scene.

Select Assets --> Resources in the Project section at the bottom. Next, go to Window --> Vuforia Configuration. Click on this VuforiaConfiguration which will be added in your Resources folder and in the Inspector click on Add Database.
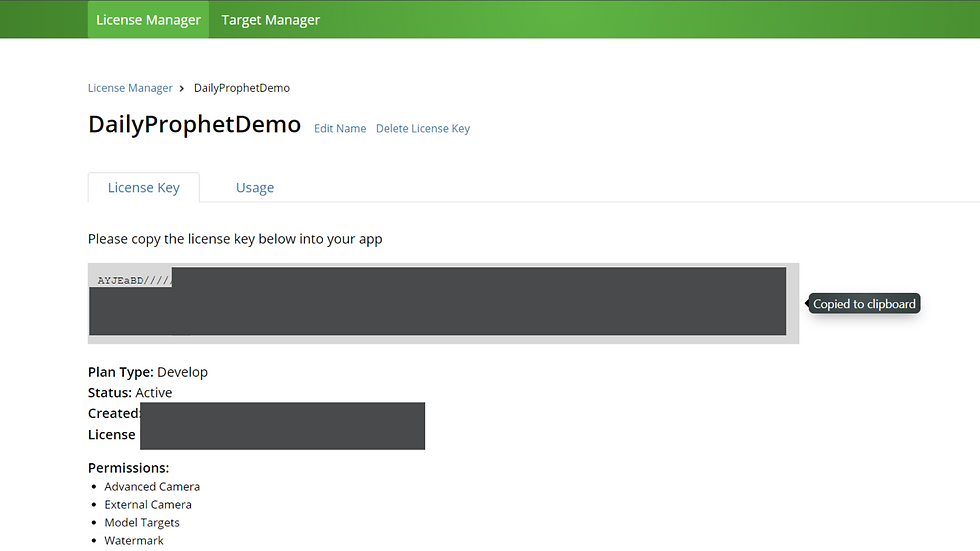
This will redirect you to the Vuforia Developer Account. If you don't have an existing account, create one and log in. Next click on License Manager and select Get Development Key.

Add any name for the license (I named it DailyProphetDemo), check the box and confirm.

Click on the newly created license i.e. DailyProphetDemo. And copy the License Key.


Paste this License Key in the Inspector window of VuforiaConfiguration.
Now in the Vuforia Developer account go to Target Manager and click on Add DataBase. Give your DataBase a suitable name and select the type as Device and hit Create. This will create the DataBase on your device itself.

.Now click on the newly created DataBase to open it. Click Add Target button and select the type as Single Image, now browse your files and select the image which you want (the one on your 'Daily Prophet' copy that should act as the 'moving image'). Width is the size of your image in real life.

Select the image by enabling the check box and click on Download DataBase. Now select Unity editor as the development platform and hit Download. This will be downloaded as a Unity Package. Drag this newly downloaded Unity Package to Assets --> Resources in the Unity Editor.

When you do this, a new window will open in your Unity Editor. Hit import.

Step 4 - Quad :
Now we are done with importing our DataBase amd Target image. Next, select the ImageTarget in the hierarchy window and in the Inspector go to the Image Target Behaviour Script. In the DataBase field you will see the DataBase we created has appeared i.e. DailyProphetDemo. Select this DataBase and in the Image Target field select our target image.
In the hierarchy panel keep the ImageTarget selected and right click in the panel then select 3D Object --> Quad. A Quad object will be made which will be the child of ImageTarget. You can see a new object on the screen placed perpendicular to the ground.

In the Inspector window of the Quad, under the Transform set the rotation field of x-axis to 90. This will overlay the Quad on top of our ImageTarget. Go on and adjust the Quad to fit the size of the ImageTarget using the Rect tool at the top left corner.

Step 5 - Video :
It's time to add our video which will act as the 'moving image'. Right click in the hierarchy (or create) and select Video --> Video Player. this will create a Video Player object in our scene.

Select the Video Player object and in the Inspector select Render Mode --> Material Override. This will help us to render the video.

Now, keep the Video Player selected in the hierarchy and drag the Quad from hierarchy window to the Renderer of the Video Player in Inspector.

Now, drag the video that you want to add (that will play and give the 'moving object' effect) to Assets --> Resources. From here drag the Video to the Video Clip field of Video Player in the Inspector.
Our video should play when the Image is Targeted and not otherwise, so disable the Play On Awake checkbox in the Inspector of the Video Player.

We will have to add our own script that will track the image to video playing. Select ImageTarget in hierarchy and you will see the Default Trackable Event Handler Script in the Inspector. Right click on it and hit Remove Component.
Now, in the Project window go to Assets --> Resources and right click then select create --> C# Script. Rename this script as TrackableEvent. Click on this script and it will open directly in your editor.
Script :
using System.Collections;
using System.Collections.Generic;
using UnityEngine;
using UnityEngine.Events;

public class TrackableEvent : DefaultTrackableEventHandler
{
    public UnityEvent onTrackingFound;
    public UnityEvent onTrackingLost;

    protected override void OnTrackingFound()
    {
        base.OnTrackingFound();
        onTrackingFound.Invoke();
    }

    protected override void OnTrackingLost()
    {
        base.OnTrackingLost();
        onTrackingLost.Invoke();
    }
 }
This script basically makes it possible to play to play the video when the target image is seen.
Now drag this TrackableEvent script from the project window to the Inspector of ImageTarget. This will automatically add this Script component to the ImageTarget.
When the script is added you can see On Tracking Found and List is Empty is displayed. Towards the right you will see a + sign, click on that.
Drag the Video Player from hierarchy to the Object of the Trackable Event Script of the ImageTarget in the Inspector.
Besides this is the function field in that select Video Player --> Play ()

Step 6 - Audio :
Our project will be incomplete without the Harry Potter Theme Song. As usual drag the audio of the theme song in the Project window under Assets --> Resources. In the Hierarchy panel, create an empty GameObject and rename it as Audio. In the Inspector window of Audio set the Position transform to (0,0,0). This won't make any difference but we do it to keep things simple.

Keeping the Audio selected in Hierarchy, drag the Harry Potter Theme song from Resources folder to the Inspector window. This will directly add the Audio Source Component and attach it to Audio object.
The spatial blend property is already set to 2D and Play on Awake is already enabled. We only have to enable the Loop checkbox so that the song does not stop after a single run and continues to play in loop.

And we are done!!!! You can test your project. We are currently working on our Project in Scene mode, to see are project in action go to Play mode.
Click the Play icon and place your copy of 'The Daily Prophet' in front of the camera. You can see the image has started to move and it is exactly similar to the wizarding newspaper.
I hope you all enjoyed this magical tutorial and this inspired you to create something using AR magic. If you liked this tutorial and plan to recreate it or have any suggestions, send me an owl (or let me know in the comments below).
GitHub link : https://github.com/lekhamirjankar/Daily-Prophet
See you later, my fellow Wizards and Witches (and Muggles).


keep it up, buddy!!🤩